During the four years since the first release of Grep Console, I frequently received requests for two features. The first was a way to export the Grep Console configuration and import it in another Eclipse workspace. That has been implemented in version 3 through the Load and Save buttons in the Grep Console dialog, as described in an earlier how-to.
Some background stuff
The most requested feature was a way to limit the console output only to those lines that match certain expressions, and disregard all the rest. In fact, when I set out to write the first version of Grep Console, that was exactly my plan. I was working on my thesis, and the program I was writing for it produced tons of log output I had to filter before I could make head or tail of it. When this turned out to be too complicated, I turned to colouring the matched lines instead, which was useful enough and allowed me to finish my thesis.
Afterwards, I tried several times to hack deep enough into Eclipse’s console classes to implement line filtering, but the result was never stable enough to be usable. So instead, I came up with the next best thing: Grep View. It’s basically the same thing, only in a separate view.
You can use Grep View instead of the regular console, or in addition to it as an overview of your console output. One important restriction is that Grep View cannot deal with changes of existing content in the console document – that is, if your console document changes text in the middle of the console output instead of at the end, Grep View will still add the new text at the end. Also, if Eclipse purges earlier console output because the console content becomes too long, Grep View ignores that. But since console output is usually linear (i.e. once a line of text is in there, it doesn’t change later on), and Grep Console’s content should normally be much shorter than the full console output (the point being to show only relevant lines from the full output), that should rarely be a problem.
So, how do you use it?
Using the Grep View
Simple enough. Let’s once again use the same demo program from the previous how-tos:
public static void main(String[] args)
{
  System.out.println("This is the first line.");
  System.out.println("Some more text...");
  System.out.println("This is the second line.");
  System.out.println("Some more text...");
  System.out.println("This is the third line.");
}
And again, we continue with the Grep Console settings from last time – get them here and load them in the Grep Console dialog in case you no longer have the howto configuration.
For starters, just run the demo program once again. The console output should look like it did last time:
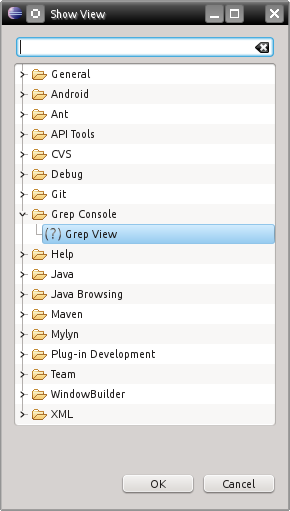
Now, open the Grep View via Eclipse’s Window/Show view/Other menu:
This will show the Grep View, which so far is still empty:
As you can see, the Grep Console copies the Grep Console and scroll lock buttons from the regular console. There’s also a drop down button to choose which console the Grep View should show, and a button to lock the currently displayed console to whatever Eclipse’s own console view is currently showing – this is enabled by default. At this point, the Grep View therefore already shows the console containing our demo output.
Then why is it empty?
Simple: Because none of our expressions were configured to be filtered to the Grep View – and everything that’s not marked for filtering is not displayed in the Grep View.
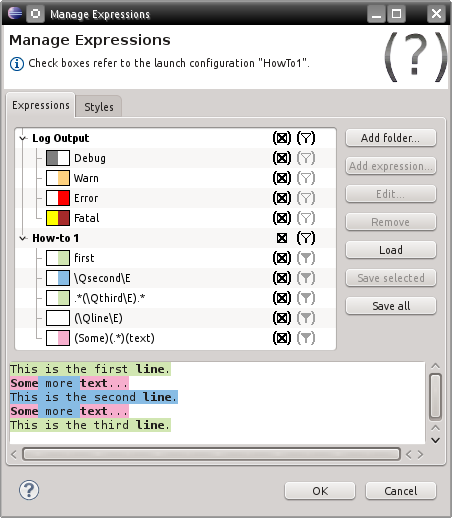
But that’s easy to fix. We already have expressions to highlight the three “This is the…line” lines in our output. To enable them for Grep View filtering, just open the Grep Console dialog (via the button in the console view or the Grep View – doesn’t matter):
A look at the right icon column, which is used to configure, filtering, shows that for our current launch configuration, all filtering values are left at their defaults (shown by filter icons within brackets). And while all our expressions are enabled for filtering by default (a filled filter icon), the “How-to 1” folder which contains them is disabled for filtering (empty filter icon).
Clicking the filter icon next to the folder until it shows a filled filter enables filtering for the folder. But wait – now all our lines would be filtered to the Grep View, rendering the whole exercise pretty pointless. We only want the “This is the…line” lines filtered. So we simply disable filtering for all expressions in our folder except for the one that reads (\Qline\E):
Now click “Ok”, and the Grep View will show just what we ordered. Even better – it applies the same style highlighting we already configured for the regular console output:
In case you wonder why the background colour styles show up here although we disabled their expressions for filtering: The lines themselves show up of course because we enabled the “line” expression, which is enough to get them into Grep View. And once a line shows up, it’s styled with all expressions that are enabled for styling, even if they’re not enabled for filtering.
In other words: The filter settings determine what lines are shown in the Grep View. But those lines that do show up there use the same styling settings they also have in the standard console view.
Performance considerations
If your program produces a lot of log output with long lines at high speeds, Grep View can become a bottleneck. Testing regular expressions against long lines of text is an expensive operation (the longer the line, the slower it is). And while Eclipse is clever enough to only test those lines for styling expressions that are currently visible, the Grep View can’t be so picky: You want all your filtered lines to show up there, so all lines from the console have to be tested against all filtering expressions.
One way to deal with this is to shorten the lines. In fact, Grep Console already does that. The settings page in the Eclipse preferences defines the maximum line length used for testing style and filter expressions:
The numbers here define the number of characters after which a line of console output is cut before testing a regular expression against it. This doesn’t affect the lines that are actually shown in the console – lines longer than the values entered here will still show up in full length. But if the part matching a regular expression occurs after the cutoff point in the line, the expression will not match the shortened line and the highlighting or filtering will not be applied. Similarly, the “whole line” style will still be applied to the whole line, but capture groups after the cutoff point will not be used.
As style matching is the less expensive operation (being only applied to currently visible lines), the default character limit for style matching is higher than that for filtering. In case your regular expressions really need longer lines, you can increase the limits at the expense of performance. You can even disable line shortening altogether by setting these values to 0. Careful though, if your program outputs a lot of very long lines at a very high speed, too long filtering limits can effectively cause your entire Eclipse workbench to stop responding. If that happens, kill Eclipse, reduce the matching limits, and try again.
Likewise, if you feel Grep Console is slowing down your program, try reducing the values here. If that doesn’t help, make sure you’ve only enabled those expressions for filtering that you really need – it’s not the number of expressions that actually match that eats your performance, but the total number of all expressions tested against your lines, even if they don’t match.
Feedback
That’s it as far as these how-tos go. I should have covered all relevant features of Grep Console now. Remember, I’m open for all kinds of feedback, bug reports and suggestions. Just use the “Feedback” link in the Grep Console menu at the top of this page to get in touch. Thank you for using Grep Console!


Hey there!
I was looking around for an Eclipse plugin that would help me filter log lines… Yours came up, and I’ve been trying to use it but I have a small setback I want to share:
In the console view, no problems, my various expressions are matched and colored as I defined it. So great job on that
Now, what’s more interesting to me is the Grep View (awesome feature!!). But here’s the problem: I’m working with a Tomcat server, with a specific log4j configuration
{rootLogger=trace, stdout
log4j.appender.stdout=org.apache.log4j.ConsoleAppender}
I think that because of this, nothing reaches the grep view…
Have you seen this before? Or maybe I’m missing a configuration step?
I tested with System.out.prinln()’s and these do show up in my Grep view.
Keep up the good work anyway, and hope to hear from you!
Alex
It is a hopeless plugin. Wasted many hours to get it working, but it never did.
It works fine for me – great tool – many thx