Bugfix Release: Grep Console 3.0.3

Version 3.0.3 of Grep Console is out, fixing a bug which caused styles to be lost after loading a settings file. Thanks to James LaPenn for reporting this bug.

Posted in Grep Console | Leave a comment

Grep Console How-to #4: Filtering Output with the Grep View

During the four years since the first release of Grep Console, I frequently received requests for two features. The first was a way to export the Grep Console configuration and import it in another Eclipse workspace. That has been implemented in version 3 through the Load and Save buttons in the Grep Console dialog, as described in an earlier how-to.

Some background stuff

The most requested feature was a way to limit the console output only to those lines that match certain expressions, and disregard all the rest. In fact, when I set out to write the first version of Grep Console, that was exactly my plan. I was working on my thesis, and the program I was writing for it produced tons of log output I had to filter before I could make head or tail of it. When this turned out to be too complicated, I turned to colouring the matched lines instead, which was useful enough and allowed me to finish my thesis.

Afterwards, I tried several times to hack deep enough into Eclipse’s console classes to implement line filtering, but the result was never stable enough to be usable. So instead, I came up with the next best thing: Grep View. It’s basically the same thing, only in a separate view.

You can use Grep View instead of the regular console, or in addition to it as an overview of your console output. One important restriction is that Grep View cannot deal with changes of existing content in the console document – that is, if your console document changes text in the middle of the console output instead of at the end, Grep View will still add the new text at the end. Also, if Eclipse purges earlier console output because the console content becomes too long, Grep View ignores that. But since console output is usually linear (i.e. once a line of text is in there, it doesn’t change later on), and Grep Console’s content should normally be much shorter than the full console output (the point being to show only relevant lines from the full output), that should rarely be a problem.

So, how do you use it?

Using the Grep View

Simple enough. Let’s once again use the same demo program from the previous how-tos:

public static void main(String[] args)
{
  System.out.println("This is the first line.");
  System.out.println("Some more text...");
  System.out.println("This is the second line.");
  System.out.println("Some more text...");
  System.out.println("This is the third line.");
}

And again, we continue with the Grep Console settings from last time – get them here and load them in the Grep Console dialog in case you no longer have the howto configuration.

For starters, just run the demo program once again. The console output should look like it did last time:

Now, open the Grep View via Eclipse’s Window/Show view/Other menu:
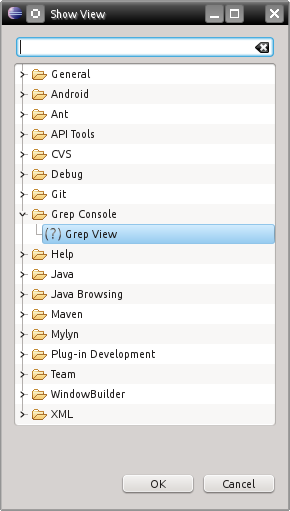
This will show the Grep View, which so far is still empty:

As you can see, the Grep Console copies the Grep Console and scroll lock buttons from the regular console. There’s also a drop down button to choose which console the Grep View should show, and a button to lock the currently displayed console to whatever Eclipse’s own console view is currently showing – this is enabled by default. At this point, the Grep View therefore already shows the console containing our demo output.

Then why is it empty?

Simple: Because none of our expressions were configured to be filtered to the Grep View – and everything that’s not marked for filtering is not displayed in the Grep View.

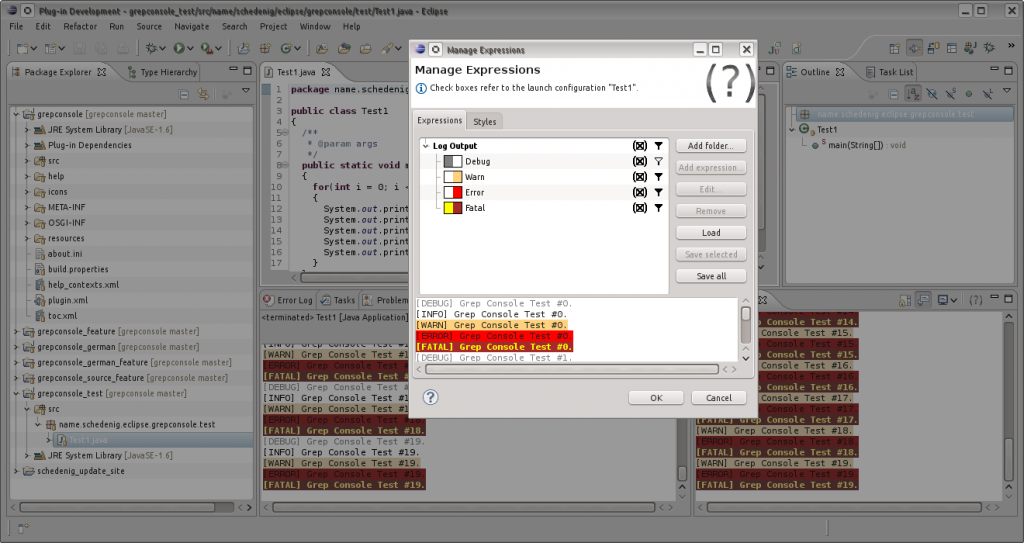
But that’s easy to fix. We already have expressions to highlight the three “This is the…line” lines in our output. To enable them for Grep View filtering, just open the Grep Console dialog (via the button in the console view or the Grep View – doesn’t matter):
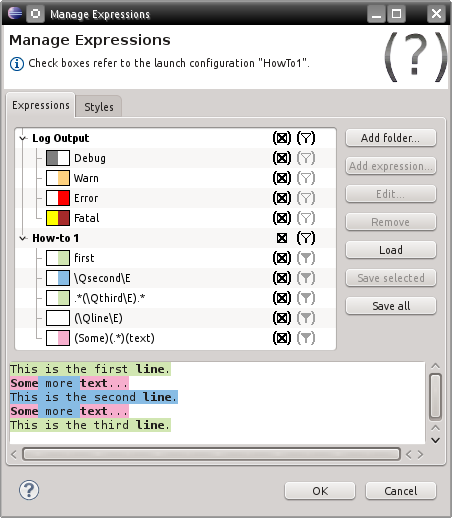
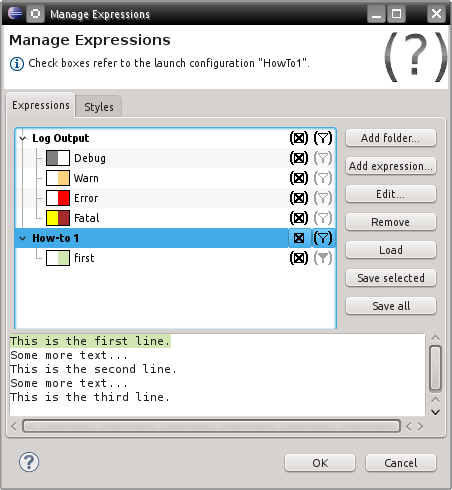
A look at the right icon column, which is used to configure, filtering, shows that for our current launch configuration, all filtering values are left at their defaults (shown by filter icons within brackets). And while all our expressions are enabled for filtering by default (a filled filter icon), the “How-to 1” folder which contains them is disabled for filtering (empty filter icon).

Clicking the filter icon next to the folder until it shows a filled filter enables filtering for the folder. But wait – now all our lines would be filtered to the Grep View, rendering the whole exercise pretty pointless. We only want the “This is the…line” lines filtered. So we simply disable filtering for all expressions in our folder except for the one that reads (\Qline\E):

Now click “Ok”, and the Grep View will show just what we ordered. Even better – it applies the same style highlighting we already configured for the regular console output:

In case you wonder why the background colour styles show up here although we disabled their expressions for filtering: The lines themselves show up of course because we enabled the “line” expression, which is enough to get them into Grep View. And once a line shows up, it’s styled with all expressions that are enabled for styling, even if they’re not enabled for filtering.

In other words: The filter settings determine what lines are shown in the Grep View. But those lines that do show up there use the same styling settings they also have in the standard console view.

Performance considerations

If your program produces a lot of log output with long lines at high speeds, Grep View can become a bottleneck. Testing regular expressions against long lines of text is an expensive operation (the longer the line, the slower it is). And while Eclipse is clever enough to only test those lines for styling expressions that are currently visible, the Grep View can’t be so picky: You want all your filtered lines to show up there, so all lines from the console have to be tested against all filtering expressions.

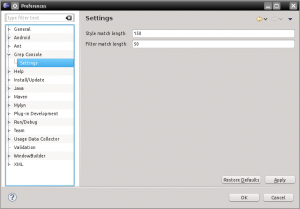
One way to deal with this is to shorten the lines. In fact, Grep Console already does that. The settings page in the Eclipse preferences defines the maximum line length used for testing style and filter expressions:

The numbers here define the number of characters after which a line of console output is cut before testing a regular expression against it. This doesn’t affect the lines that are actually shown in the console – lines longer than the values entered here will still show up in full length. But if the part matching a regular expression occurs after the cutoff point in the line, the expression will not match the shortened line and the highlighting or filtering will not be applied. Similarly, the “whole line” style will still be applied to the whole line, but capture groups after the cutoff point will not be used.

As style matching is the less expensive operation (being only applied to currently visible lines), the default character limit for style matching is higher than that for filtering. In case your regular expressions really need longer lines, you can increase the limits at the expense of performance. You can even disable line shortening altogether by setting these values to 0. Careful though, if your program outputs a lot of very long lines at a very high speed, too long filtering limits can effectively cause your entire Eclipse workbench to stop responding. If that happens, kill Eclipse, reduce the matching limits, and try again.

Likewise, if you feel Grep Console is slowing down your program, try reducing the values here. If that doesn’t help, make sure you’ve only enabled those expressions for filtering that you really need – it’s not the number of expressions that actually match that eats your performance, but the total number of all expressions tested against your lines, even if they don’t match.

Feedback

That’s it as far as these how-tos go. I should have covered all relevant features of Grep Console now. Remember, I’m open for all kinds of feedback, bug reports and suggestions. Just use the “Feedback” link in the Grep Console menu at the top of this page to get in touch. Thank you for using Grep Console!

Posted in Grep Console | Tagged , | 3 Comments

Grep Console How-to #3: Capture Groups

Note: Grep Console 3.0 and 3.0.1 had a bug that caused some expressions to be created not quite as described here. This was fixed in version 3.0.2. If you still have an older version, please update before continuing with this how-to.

After the last two how-tos described the basics of Grep Console, it’s time for some advanced stuff. This time, I’ll be showing how to use capture groups to highlight only certain keywords in a line.

Once more, we’ll reuse the code from the previous examples for our demo program:

public static void main(String[] args)
{
  System.out.println("This is the first line.");
  System.out.println("Some more text...");
  System.out.println("This is the second line.");
  System.out.println("Some more text...");
  System.out.println("This is the third line.");
}

Also, here‘s the settings file containing the grep expressions created during the first two how-tos, in case you don’t have them on your system. Simply load the file in the Grep Console dialog.

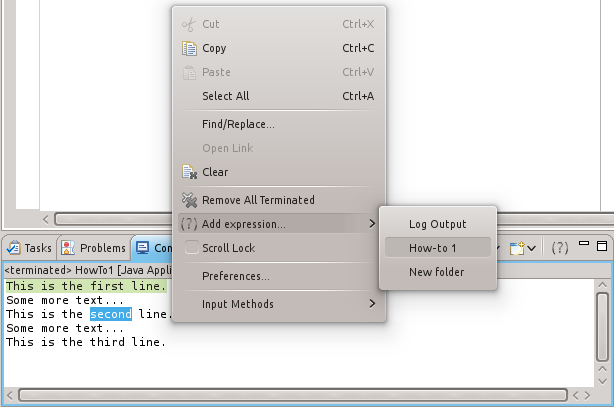
We now want to add an expression to highlight only the single word “line”. The easiest way to do this is to run our program once, select the word “line” in the output and right-click to open the context menu, then select “Add expression” and the “How-to 1” folder.

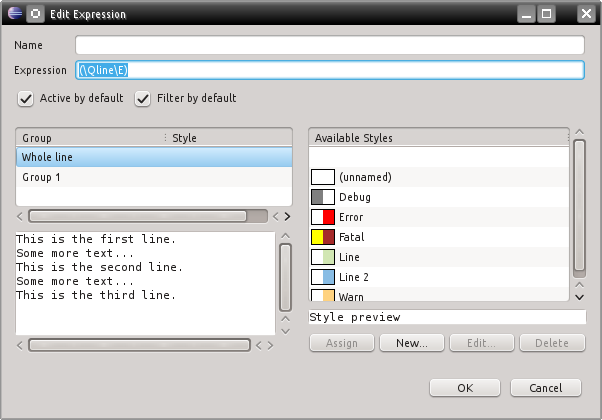
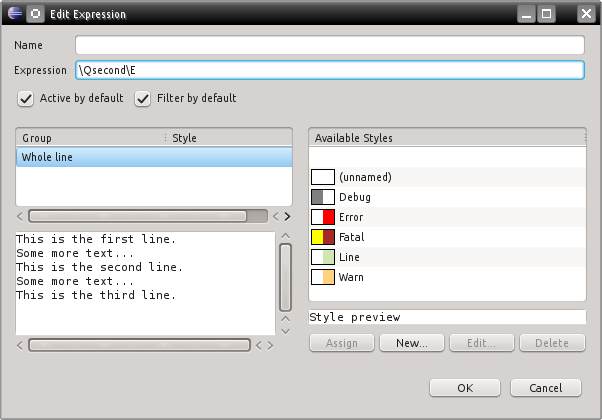
Take a look at the grep expression this shows in the expression dialog:

As you can see, the text “line” is surrounded by parentheses. In regular expressions, they are used to denote a capture group. Capture groups can be used to select certain parts of lines matched by the regular expression as a whole. Remember that Grep Console automatically wraps every expressions with “.*” strings at the beginning and end. The full expression in this case therefore looks like this:

.*(\Qline\E).*

The “\Q…\E” part just means that any special characters between the “\Q” and the “\E” should not be treated as regular expression characters – we could write “.*” inside this part and it would only match a dot character followed by an asterisk, not any number of arbitrary characters as “.*” usually does in a regular expression. In this case, “line” is a simple enough string without any special implications, so we could just as well drop the “\Q” and “\E” without problems.

The whole expression therefore means: Match lines that contain any number of arbitrary characters followed by the string “line” and any number of additional arbitrary characters, and make “line” a capture group.

Grep Console recognises capture groups and allows you to assign a distinct style to each capture group. So far, we’ve only used the “whole line” group, which is present for every regular expression and applies, as the name says, to the entire matched line. Now that we have a capture group, the table below the expression field shows a second line, labelled “Group 1”. This corresponds to our capture group, and a style applied to this group will only be used on the part of the line described by the group.

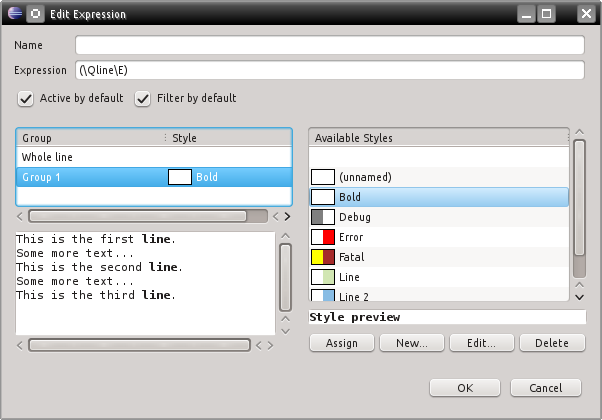
Create a new style for the capture group by double clicking on the “Group 1” line and enable bold font in the style dialog. The preview should now look like this:

As you can see, every line containing the word “line” has that word highlighted in a bold font.

But what about the expressions we already created earlier to highlight those lines? Click “Ok” to close the dialog and take a look at what the console output looks like now:

Grep Console combines all styles matching a line. In this case, we’ve specified that three of our console lines should be styled with a background colour, and that the word “line” should be bold. The result is just that: Three lines with background colour and a bold font for the word “line”.

But you can also assign different styles to different parts of a line with a single expression. Open the Grep Console dialog and create a new expression using the following regular expression:

(Some)(.*)(text)

If you type this text into the expression field, you may notice the text sometimes turning red as you type. If the expression is shown in a red font, it means that the current expression is invalid. Hovering the mouse cursor over the text field will open a tool tip showing a description of the error, as provided by the Java API. For example, if you type an opening parenthesis without a matching closing one, the expression will be invalid.

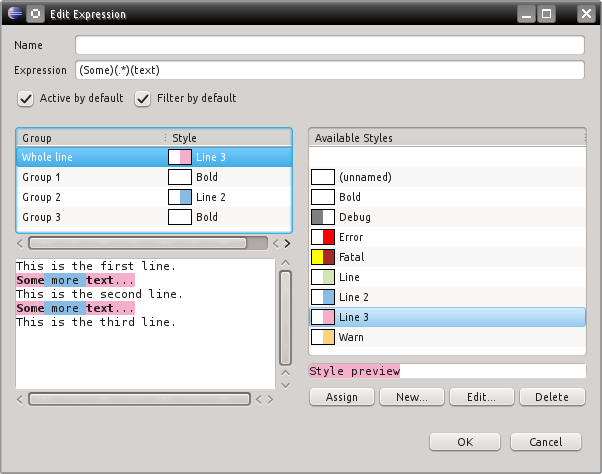
The above expression contains three capture groups, and the table below the expression field will therefore have four entries: “Whole line”, “Group 1”, “Group 2” and “Group 3”. Create a new background colour style for the “whole line” group, assign the “bold” style we created above to groups 1 and 3, and assign the background colour style used for the second line (named “Line 2” in my example) to group 2.

The result should look like this:

As you can see, the second capture group spans all the text between the first (“Some”) and third (“text”) group, including white space. Capture group styles take precedence over styles applied to the whole line, so the middle group is shown with a blue background, while the rest of the line uses a pink one.

Capture groups are an excellent tool to highlight relevant parts of log output lines. For example, if your program regularly outputs a certain numeric value of interest, you can use a regular expression to identify all lines containing this value, and then use a capture group to apply a text style to only the numeric value. This allows you to easily find the relevant information in your log output.

In closing, here’s a look at the fully styled console output:

The next how-to will introduce the Grep View.

Posted in Grep Console | Tagged , | Leave a comment

Service release: Grep Console 3.0.2

Turns out I introduced a bug shortly before the 3.0 release that produced slightly inconsistent regular expressions when using the “Add expression” context menu: When used from the console, the new expression would be missing the automatic capture group brackets, while the same action called from the preview would add the “.*” bits that are unnecessary in Grep Console 3.

Service release 3.0.2 fixes this.

Posted in Grep Console | Tagged , | Leave a comment

Grep Console How-to #2: The Basics Pt. 2

In the previous how-to, I explained how to add a grep expression and a style to highlight a line. This time, I’ll show some alternate ways of creating expressions.

We start out just where we took off last time. This is our demo program:

public static void main(String[] args)
{
  System.out.println("This is the first line.");
  System.out.println("Some more text...");
  System.out.println("This is the second line.");
  System.out.println("Some more text...");
  System.out.println("This is the third line.");
}

Let’s begin with a feature for which I received many requests in version 2 of Grep Console: You can now export and import a settings. Exporting works by clicking “Save all” or “Save selected” from the Grep Console dialog. This will open a file dialog to write either all folders and expressions plus their associated styles to an XML file, or just those you’ve currently selected. Afterwards, you can import them via the “Load” button. If you no longer have the expression created in the previous how-to, here’s the file – just import it.

This is what your configuration should look like before we continue (never mind if you’ve modified or deleted the default debug/warn/error/fatal expressions, we won’t be needing those):

So, let’s have a look at how else we can add new expressions. Run the demo program and have a look at the console. It should look like this:

We now want to add highlighting to every line containing the string “second”. Select that word in your console, by click-dragging with your mouse or by double clicking it. Now right click to open the context menu. You’ll see a menu entry with the Grep Console icon labelled “Add expression”:

Select that, and in the sub menu that appears, select “How-to 1” – which is the folder we created last time, and which is where we want to create the new expression. (You could click “Log Output” here to add the new expression to the default folder of log expressions instead, or “New folder” to create a new folder to which the expression will be added – Grep Console will prompt you for a folder name in this case).

Now the edit expression dialog will open directly, looking like this:

As you can see, Grep Console automatically filled in the expression this time. It wrapped it with a “\Q…\E” string, which in Java regular expressions means that everything in between should be treated as is. That means that our string could contain special characters like “.” or “\”, but they still wouldn’t be treated as regular expression characters. In our case, the string is simple, so they’re not necessary, but Grep Console adds them anyway, just to be on the safe side.

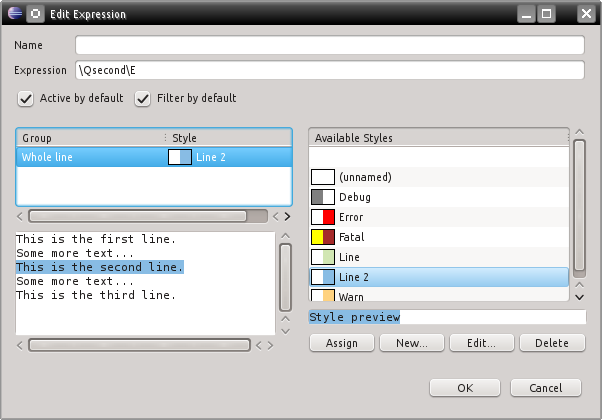
We want the new expression to use a new style, so that the second line is highlighted in a different colour. While the “whole line” group has no style assigned yet, we can double click on it to create a new one. I named it “Line 2” and set “88bce4” as the background colour:

Note how the preview shows the correct highlight for the second line, but leaves the others unstyled, including the first one. That’s because it’s a preview specifically for the expression we’re currently editing.

Click “Ok” to close the dialog, and the console will highlight both the first and the second line according to our two expressions:

For a third way to add an expression, open the Grep Console dialog again by clicking on the icon in the toolbar. You’ll notice that the preview is showing the current console output so that we can already see our current expressions in action.

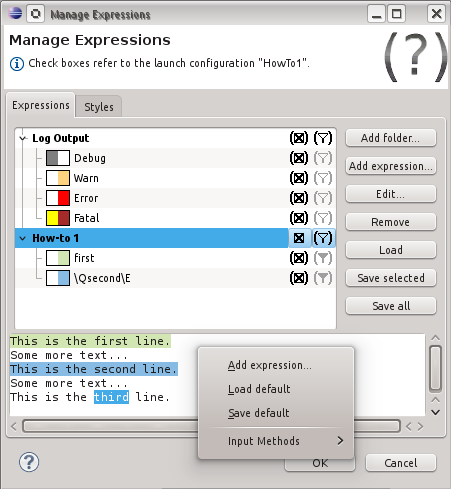
In the preview text, just like in the console, a context menu allows use to add an expression for the currently selected string. The difference is that here we don’t have a sub menu to select the target folder – the expression is always added to the folder currently selected in the table above the preview.

Select our folder in the table, then select the string “third” in the preview and right-click:

Click “add expression”. Once again, the expression dialog will open. We want to use the same colour for the third line that we already used for the first one, so instead of creating a new style, this time we’ll simply assign the old “Line” style by selecting it and clicking “Assign” (or double clicking it).

Here’s the final result:

Another word on the preview in the Grep Console dialog: If there were no current console, or we had opened the settings from Eclipse’s preference dialog, the preview would show some default text instead. You can always load that default text by right-clicking the preview and selecting the corresponding menu entry. You can also freely edit the preview text – just type whatever you want and see your expressions applied to it live. You can use the context menu to save the current text as the new default for later reuse.

The preview in the expression dialog offers similar features in the preview. Instead of creating a new expression, here you can set the expression item’s grep expression from the selected text.

Next time we’ll have a look at regular expression groups.

Posted in Grep Console | Tagged , | Leave a comment

Grep Console How-to #1: The Basics

Here’s the first of the promised posts about Grep Console’s features. I’ve decided to do these as simple how-tos, and this first one covers the basics of highlighting console lines. If you’ve never used Grep Console before, this should show you all you need to get going. If, on the other hand, you’ve upgraded from Grep Console 2 to the new version 3, you’ll see how the new expression management differs from the previous incarnation. For this how-to, I’m assuming you’ve already installed Grep Console 3.

Grep Console is about finding and highlighting certain lines of text in Eclipse’s console. Before we can find and highlight lines, we have to get some into the console. Here’s a simple demo program to cover this how-to (I’m pasting only the main method):

public static void main(String[] args)
{
  System.out.println("This is the first line.");
  System.out.println("Some more text...");
  System.out.println("This is the second line.");
  System.out.println("Some more text...");
  System.out.println("This is the third line.");
}

Running this will show the following output in your console:

We want the “This is the…line” lines styled with different colours. There are three ways to do that – which is why I made the code output three lines. Let’s start with the simplest one. Open the Grep Console dialog by clicking the Grep Console icon in the console’s toolbar:

As you can see, there are already some demo settings provided by Grep Console upon installation. We won’t be using them, so instead create a new folder by clicking the “Add folder” button:

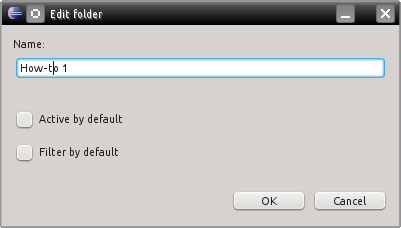
Here you can enter a name for the new folder. We’ll be using this folder for grep expressions specific for this how-to, so we disable both “active by default” and “filter by default” to prevent Grep Console from using the folder for all our projects. Clicking “Ok” adds the new folder.

Next, let’s add the first grep expression to the folder by selecting the new folder and clicking “Add expression”:

Each expression represents one grep expression that is tested against each line of console output. The most important field therefore is the “expression” field (the second line in the dialog). Here you can enter a regular expression. I’m assuming you’re familiar with at least basic regular expressions; if not, this Wikipedia article gives a basic overview, while this page from the Java API documentation describes the details of the regular expression syntax available in Java.

Grep Console will automatically add “.*” strings to the beginning and end of the expression entered here, so the simple expression “first” will be enough to find all lines containing the string “first”. The name above the expression is optional; whenever Grep Console lists an expression that has no name, it will show its regular expression instead.

We leave “active by default” and “filter by default” checked in this case: Since the new expression belongs to our “How-to 1” group that is disabled by default, other projects won’t be bothered by the new expression anyway.

To highlight the lines matched by our expression, we have to assign a style. Click “New” below the list of available styles to create a new one:

In this case, we should enter a name, as all styles without a name are listed as “(unnamed)”, which can become quite confusing if there are too many.

There are several options we can configure in our style. In this case, we’ll just select a background colour. You can do this by clicking the colour picker button to the right of the background field, or by entering a hex RGB value of a colour, or simply by activating the checkbox – Grep Console will pick a random colour if none has been specified yet.

Clicking “Ok” creates the new style. It now shows up in the list of styles on the right side of the expression dialog, and it has also been assigned to the “Whole line” group in the table of the left. This means that whenever Grep Console finds a line matching the specified regular expression, the whole line will be styled using the style we just created. I’ll be explaining groups in a later tutorial.

Now that our expression is fully defined, the preview on the lower left of the expression dialog already shows how our first console line is highlighted by the new style. Click “Ok” to create the expression and close the dialog.

We’re now back in the main Grep Console dialog – but unlike the expression window, this one doesn’t yet show any highlighting in the preview:

The expression dialog showed a working preview because it was a preview for that specific expression. The main dialog shows a preview of all enabled expressions, and as you recall, we set the “How-to 1” group to be disabled by default. While the expression itself is enabled, it’s still not used because it is part of an inactive group. This is also the reason why both the group and the expression are shown in a grey font.

Unlike in version 2 of Grep Console, where all settings were global, version 3 can use different settings for different launch configurations. Expression (and folder) items are still global, and modifying or deleting them will affect all launch configurations, but which items are enabled can be configured individually for each launch configuration.

If you look at the info panel at the top of the dialog, you will see that the dialog shows the specific settings for the launch configuration we used to start our demo program. This means that when we enable or disable items in this dialog, these settings only apply to this launch configuration. If you open the dialog without an active console (or through Eclipse’s preference dialog), there won’t be an active launch configuration, and you will be editing the global settings directly. On that note, the “active by default” and “filter by default” settings in the folder and expression dialogs always refer to the global settings.

Since the current dialog shows the settings for our own launch configuration, we can use it to enable the highlighting settings we created for our demo program. All other launch configurations will be unaffected by these settings – the “How-to 1” folder will still stay disabled for them.

To enable the folder, click once on the unchecked box  to the right of it (in the left of the two columns of icons). This will check the box, turn the folder and its expression black and highlight the first line in the preview:

The checkbox you just clicked has three states: An empty box means that the item is disabled for highlighting (in case of a folder, this also means that all of its contained items, regardless of their own activation settings, are disabled). A checked box means that the item is enabled for highlighting. A box between brackets (checked or unchecked) means that an item is neither specifically enabled nor disabled for the current launch configuration, and that its setting is taken from the item’s default setting. If you are editing the global defaults instead of a specific launch configuration, the normal checked and unchecked boxes already refer to the item’s default setting, and the third state (the box between brackets) is not available.

Having enabled our new folder, clicking “Ok” will confirm these settings and close the dialog. The console should now look like this:

This should be enough to get you started with Grep Console. The next how-to will show a few alternate ways to create a new expression.

Posted in Grep Console | Tagged , , | Leave a comment

Performance fix: Grep Console 3.0.1

Murphy strikes again. Before releasing version 3.0, I’d been testing Grep Console at work for several weeks, with the occasional issues (which I obviously fixed before the release), but without any critical bugs. Now, only two days after the release, my Eclipse suddenly froze (reproducibly) when running a certain test case.

Turns out that the test case logged a lot, including some very long lines. Testing these lines against regular expressions was a serious performance killer, especially in combination with the Grep View (style expressions seem to be applied by Eclipse to only those lines that are actually visible at a given moment, whereas the Grep View has to be filled with all matching lines immediately).

The only way to get rid of the performance bottleneck was to shorten the string that is tested against the regular expression. Therefore, the new version 3.0.1 provides settings for the maximum length of characters to be used when evaluating expressions. These values default to 150 characters for style expressions and to 50 characters for filter expressions and can be changed via the Eclipse preferences. When logging a lot, Grep View will still have a notable impact on the overall performance, but the match length settings should help keep things from getting all too slow.

Bear in mind that shortening these limits too much could result in some expressions no longer matching longer lines. In these cases, those lines will not be styled (though they will still be displayed in full), or not filtered to the Grep View.

Another way to speed things up is to only enable those expressions (especially for filtering) that you actually need. Grep Console will only test activated expressions, so each unused, deactivated expression will bring a small performance boost.

Posted in Grep Console | Tagged , | Leave a comment

Grep Console 3.0 released!

Well, here it is, finally. After months of promises and several aborted rewrites, Grep Console 3.0 has been released.

The new version addresses several suggestions I’ve received since the release of version 2. New features of this release include:

  • Folders – Grep expressions can now be arranged in folders. This allows you to group together expressions that belong to the same project. You can also use folders to quickly enable or disable an entire group of expressions.
  • Styles – The style settings defining the highlighting colours and font settings for grep expressions are now independent from the expressions themselves. They have a name and can be used for multiple expressions.
  • Import/Export – Expressions and styles can be written to a file and imported into another workspace.
  • Launch Configuration Support – Expressions can now be enabled or disabled in launch configurations. This allows you to use different highlighting settings for different projects.
  • Grep View – A new view displays a subset of the full console output, showing only lines that are matched by grep expressions.

Due to the new features, Grep Console has become more complex. The user interface in particular has increased in complexity (the main reason for two aborted earlier attempts at version 3). Feedback regarding the new GUI is welcome, as of course are all other comments, bug reports or suggestions. Please refer to the feedback page.

To install the new version, go here. As before, Grep Console is released under the Eclipse Public License.

Over the next few days I’ll be adding posts describing the new features.

Posted in Grep Console, Uncategorized | Tagged , | Leave a comment

Setting up a gitolite server in Ubuntu

In the middle of last night, I decided to finally get my local git repository back on my server before going to bed. I was too lazy to read any detailed documentation, so I just googled a few howtos. None of them was entirely complete, so the following is culled from a small number of them.

Scenario

I had a server running Ubuntu 12.04 and a client (running the same version, but any Linux distribution should do). The client already had git installed, with a local repository I’d been using for a while. I wanted to get a git server running on the server and push the local repository there, so that when everything was done, the local repository would just be a clone of the main one on the server.

I’d read about gitosis repeatedly, but as it turned out, Ubuntu had dropped support for that in favour of gitolite, so that’s what I ended up putting on the server.

Installation

All the necessary packages are in Ubuntu’s standard repositories:

sudo apt-get install git gitolite

We’ll be handling gitolite via a separate user, so we have to create it (sans password, so no direct logins possible):

sudo adduser \
  --system \
  --shell /bin/bash \
  --gecos 'git version control' \
  --group \
  --disabled-password \
  --home /home/git \
  git

Access to gitolite will be authenticated via SSH keys. If the user we’re installing gitolite with doesn’t yet have a SSH key pair, we can create one:

ssh-keygen -t rsa

We’ll need the public key for the git installation. As the git user doesn’t have access to our .ssh directory, we copy the key file to the temp directory:

cp ~/.ssh/id_rsa.pub /tmp/local.pub

Now we can login as the git user and setup gitolite:

sudo su git
echo "PATH=$HOME/bin:$PATH" > ~/.bashrc
gl-setup /tmp/local.pub
exit

gl-setup will open the gitolite config file in the editor, but we can just accept the defaults by saving and closing.

Configuration

Back in our regular user account, we can now clone the gitolite-admin repository, which is used to change the repository configuration:

git clone git@localhost:gitolite-admin.git

We’ll be using gitolite-admin to add the login key for our remote user and to create a new repository.

First, let’s allow the remote user (on the client system) to access gitolite. We need the user’s public key file (if the user doesn’t yet have a key pair, see above).

gitolite expects all key file names to follow the pattern <username>.pub. They can, however, be nested in sub directories. Since the same user may have different keys on different machines, we use a separate directory for each client to store the key files:

mkdir gitolite-admin/keydir/myclient
cp my_uploaded_id_rsa.pub gitolite-admin/keydir/myclient/myusername.pub

We can now add a new repository and give our user access to it by editing gitolite-admin/conf/gitolite.conf, like so:

repo    gitolite-admin
  RW+     =   local

repo    testing
  RW+     =   @all

repo    mynewrepo
  RW+     =   myusername

The first two repositories were already configured. I added “mynewrepo” and gave “myusername” full access to it. Multiple users can be specified by multiple permission lines for a repository. The “@all” keyword can be used to grant permissions to all users who have access to gitolite.

To activate these changes, we simply have to commit and push gitolite-admin:

git add -A
git commit -m 'New user keys and new repository.'
git push origin master

The new, empty repository should now be available and you should be able to do this on the client system:

git clone git@myserver:mynewrepo.git

Note that gitolite repositories are always access as the “git” user. gitolite will recognise your actual user via your SSH key and use the appropriate permissions.

Pushing the existing repository to the server

The only thing missing now is making the newly setup server the origin of the git repository we already have. This is simple, just do this from within the local repository’s directory:

git remote rm origin
git remote add origin git@myserver:mynewrepo.git
git push origin master

Done!

References

Posted in git, Uncategorized | Tagged , , | 23 Comments

Installing Android 4 ICS on the Google Nexus One

Disclaimer: This is a guide for rooting and flashing the Google Nexus One smartphone. The described procedure worked for me, but there is no guarantee that it will work for you. If it doesn’t, it may brick your phone. Proceed at your own risk.

Introduction

I’m a big fan of the Android system, both from a consumer perspective (I like the usability of the system, and I like not being restricted by the manufacturer), from a developer perspective (the tools are free, programs are easy to test, and the API is good), and from an idealistic perspective (open source, and maintained a company that’s not focused on patent wars).

There has been a lot of criticism about Google’s supposed update policy, when in fact the problem mostly lies with device manufacturers. That’s why I buy Nexus devices – the updates come directly from Google, and if necessary, I can hack the phone.

With my Nexus One already being a few generations old, hacking finally has become necessary. There won’t be an official update to Android 4 Ice Cream Sandwich (supposedly for memory reasons, see below), but at the same time, the Android 2 apps have gotten so many updates that even with just the bare necessities installed, my phone has continuously been at its memory limit for months.

With some repartitioning and a modded ROM, the Nexus One can run Android 4 and have plenty of RAM left to be usable. The internet is full of forum posts and YouTube videos showing bits and pieces of the update process, but I haven’t been able to find a guide that describes the entire procedure step by step. Here, therefore, I’ll describe what I had to do to get my phone upgraded.

Following this guide will install the BCM Ice Cream Sandwich mod (based on CyanogenMod 9) on a stock Google Nexus One. As ICS requires a larger internal system partition than the N1 comes with originally, we’ll be using the latest regular CyanogenMod release available for the N1 to root and partition the phone. The end result will be a N1 running ICS, with apps stored on the SD card to leave enough free RAM for a working system.

Requirements

  • A Nexus One phone, obviously. All links and bootloader procedures are specific to this device.
  • A USB connection between your phone and your desktop computer.
  • The Android SDK installed on your desktop system. If you don’t have it, get it here.
  • A backup of your current data. The upgrade will completely wipe your phone and SD card, so backup anything you still need after the upgrade before you start.
  • Time. If everything goes smoothly and you can follow the guide directly, the upgrade probably won’t take too long. I didn’t have a straightforward guide, and not everything did go smoothly, so the whole procedure took me several hours.

Keep in mind that during updating, you’re phone won’t be usable, and if you break something, it might take even longer to get it working again. Have a backup phone ready in case you need one.

You will be controlling your phone from your desktop computer several times during the upgrade. This guide is written for Ubuntu Linux systems, but different operating systems should not be too different.

Downloads

During the upgrade, we’ll be using the following downloads:

  1. Fastboot: Download site (pick the correct version for your operating system)
  2. Amon_Ra’s Recovery: Binary image linked in CyanogenMod’s N1 update guide
  3. CyanogenMod for Nexus One: Download site (use latest version – at the time of writing, this is 7.1.0-N1).
  4. CyanogenMod Google Apps: Download site (matching version for the CyanogenMod image)
  5. 4EXT Recovery free version: Download site
  6. BlackRose: Download page (download attached to main post)
  7. BCM ICS: Download page (binary images listed under “ROM Downloads”)

Unlocking the Bootloader

The phone’s bootloader has to be unlocked before we can flash new images.

  • Install fastboot [1] on your computer.
  • Reboot your phone into the bootloader: Hold down the trackball while powering on the phone. After a brief moment, the phone should show a white screen with a menu and three skating Andy figures at the bottom.
  • Make sure the phone is connected to the computer via USB.
  • Type the following into your console:
    fastboot oem unlock
    (This is assuming that you’ve installed fastboot in your path. Otherwise you may have to type the full path to the fastboot executable)
  • The phone will show a confirmation screen. Select “Yes” by pressing the volume up button, then confirm by pressing the power button.

Your bootloader should now be unlocked. To show this, the phone’s boot logo will show an open lock at the bottom of the screen from now on.

Rooting the Phone

Next, we have to root the phone so we can replace the recovery image and repartition the internal memory. There may be simpler ways to do this, but the easiest procedure I found was to simply install CyanogenMod as per the official instructions.

  • Make sure your phone is booted into the bootloader.
  • Type into your console:
    fastboot boot recovery recovery recovery-RA-passion-v2.1.1-CM.img
    …where the last part of this line is the filename (and path) of your downloaded Amon_Ra image [2].
  • The phone should now boot into the recovery system.
  • Select “Wipe”, then “Wipe ALL data/factory reset”.
  • Select “Enable USB-MS” to activate USB mounting. Copy the standard CyanogenMod image [3] and the Google Apps image [4] to the SD card.
  • Select “Flash ZIP”, then select the Cyanogen image from the SD card. Do the same for the Google Apps image.
  • Reboot the  phone and follow the on screen instructions.

Your phone should now be rooted and running CyanogenMod 7. If you’re happy with this version, you could just stop now. Otherwise, continue to prepare the phone for ICS.

Repartitioning the SD Card

My main reason for hacking my phone was the lack of free RAM when running the latest official Android version for the N1. ICS requires even more memory, but CyanogenMod lets you move all “internal” applications to a partition on the SD card, effectively leaving more actual RAM for the system itself. We have to create this partition.

  • Install 4EXT Recovery [5] via the console:
    adb install 4EXTRecoveryUpdater.apk
    (Alternatively, you can buy the full version from the Google Play Store)
  • Launch the 4EXT Recovery app on your phone.
  • Select “Settings”. This will download the latest updates and then apparently take you back to the menu.
  • Select “Settings” again to install 4EXT as the recovery image. A list showing available versions will appear, select one (I simply picked the most current one). Select “Install”.
  • Once the installation is complete, boot into recovery mode via your computer’s console:
    adb reboot recovery
  • Your phone should reboot and show the 4EXT main menu.
  • Select “tools”, then “partition sd card”, confirm and pick “remove all partitions and start from scratch” to wipe all data from your SD card and start repartitioning. 4EXT will now ask you for partition sizes. The first ext partition is where CyanogenMod will put “internal” apps. According to various forum posts, this should not exceed 1.5GB. I entered “1024” for a 1GB partition. You can skip the second ext partition as well as the swap partition. Confirm your settings, then select a file system – I entered “ext4”.

4EXT should now have created your partitions. The remaining space on your SD card was created as a data partition, similarly to the one before repartitioning.

Repartitioning Internal Memory

Your phone is now ready to have apps stored on the SD card instead in the phone’s own memory, but we still have to resize the internal storage before we can install ICS. We’ll use BlackRose for that. Reminder: This guide is written for Linux. For Windows, you have to use the appropriate .exe files (included in the same download archive) instead of the binaries listed here.

  • Unzip BlackRose [6]. On my Linux system, I had to also make the BlackRose binary executable (chmod u+x BlackRose).
  • Start BlackRose from the command line:
    ./BlackRose
  • You should get a message that BlackRose is waiting for devices. Reboot your phone, BlackRose should install and quit. Boot your phone again.
  • BlackRose has an interactive mode for flashing your phone with new internal partitions, but it didn’t work for me. Instead, I did this:
  • Run BlackRose in editor mode:
    ./BlackRose editor
  • Select “resize” and enter the desired partition sizes. The BCM mod requires at least 180MB on the system partition (the stock partition is 145MB). I followed some tutorial and typed “220” for the system partition and “10” for the second partition, then entered “ics” as the device name. BlackRose will terminate, creating a file hboot_brcust.nb0 in the current directory.
  • Execute the following command to flash the newly created image to your phone:
    ./other/fastboot-l flash hboot hboot_brcust.nb0
    (on Windows, use fastboot-w instead of fastboot-l)
  • Again, BlackRose will wait for a device. Reboot your phone into the bootloader and it should install the image.
  • Run on the command line:
    fastboot -w

Your phone’s bootloader should now show “220/10/206” in the 2nd line, confirming that the new partition sizes have been flashed. At this point there is no working system on your phone.

Installing BCM ICS

Nearly done now. The phone is ready for ICS, we just have to flash the BCM image.

  • Boot into recovery mode from the bootloader.
  • Toggle USB storage to make the SD card mountable via USB. Copy the BCM ZIP [7] to the phone’s data partition (at this point, there may be more than one partition available on the card, be sure to pick the right one). Unmount cleanly (I didn’t, resulting in a broken ZIP on the card), then go back to the main  menu.
  • Select “install from sdcard” and choose the BCM ZIP on the card. This will start the installation process.
  • At this point, you can either install with standard settings, or select “custom” to configure some more details, including the SD card cache size (the default settings is optimised for class 4 cards).
  • Finally, reboot your phone once more.

Done! You should be seeing a rather ugly splash screen, and after a while ICS should appear on your phone. Connect to your Google account (if you’re using one) as usual and start setting up your phone.

References

Posted in Android, Uncategorized | Tagged , , , | 24 Comments